It is mid-September, and the beloved American tradition of Apple Picking is in full swing. You brought home a massive basket of fresh, crisp Granny Smith and Honeycrisp apples, and the undeniable urge to start your fall baking has officially hit.
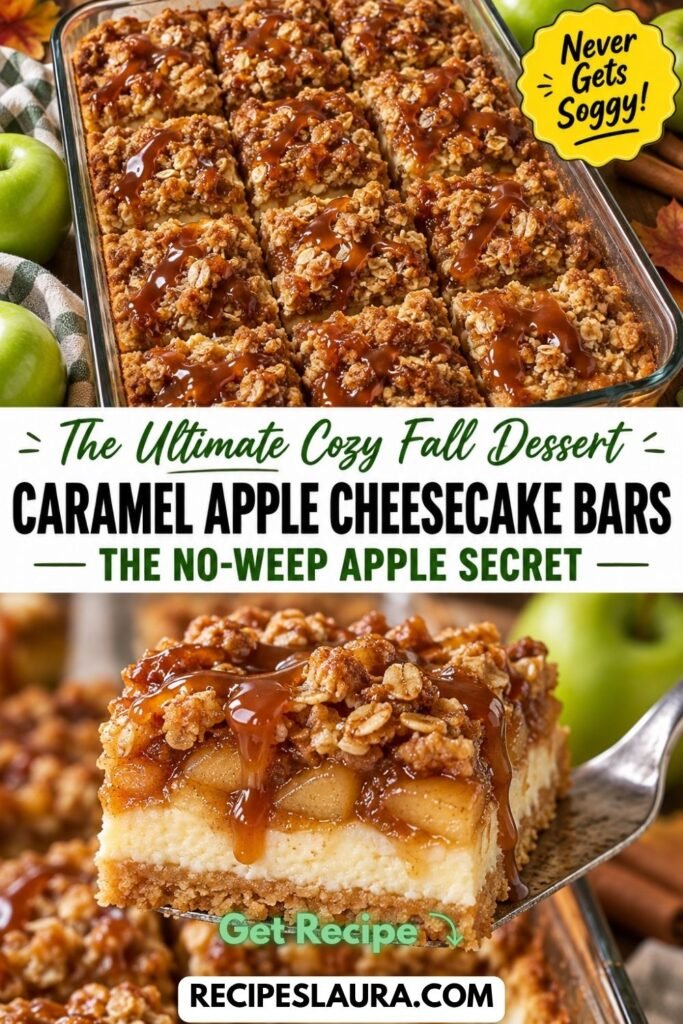
While traditional apple pies and crisps are fantastic, if you want to completely steal the show at your next autumn gathering, you need to make Caramel Apple Cheesecake Bars.
If you are endlessly searching Pinterest for the absolute best fall dessert recipes, this is the holy grail. We are combining four epic layers into one 9×13 pan: a buttery shortbread crust, a rich and tangy vanilla cheesecake filling, a layer of cinnamon-spiced apples, and a crunchy oat streusel topping (all heavily drizzled in caramel, of course!).
But let’s talk about the biggest tragedy in fruit baking: wet, soggy, weeping cheesecake.
Because fresh apples are packed with water, putting raw apples directly onto cheesecake batter will turn your beautiful dessert into a watery, gummy soup. Today, I am sharing the professional “Stovetop Sauté” hack that guarantees perfectly crisp layers and a flawless cheesecake center!
👉 Looking for a savory, hearty 1-pan dinner to serve before this epic dessert? Try my [Melt-In-Your-Mouth Crockpot Pot Roast]!
🌟 Why You Will Love This Recipe
- The “No-Weep” Guarantee: My 5-minute apple sauté trick evaporates the excess water, ensuring your cheesecake stays dense and firm.
- Easier Than Pie: Making a shortbread crust for a 9×13 pan is 100x easier than rolling out a traditional pie crust!
- Feeds a Crowd: Cuts cleanly into 16 to 20 thick, beautiful squares.
- Make-Ahead Magic: Cheesecake requires chilling, meaning you can (and should!) make this entire dessert 1 or 2 days before your party!
🛒 Ingredients & The “Apple” Guide
The Shortbread Crust & Streusel Topping (We use the same mixture for both!):
- 2 cups All-Purpose Flour: (Spoon and leveled).
- ½ cup Old-Fashioned Rolled Oats: (Adds a beautiful rustic crunch to the topping).
- ¾ cup Light Brown Sugar (Packed).
- 1 cup (2 sticks) Unsalted Butter: (Cold and cut into small cubes).
The Creamy Vanilla Cheesecake Center:
- 2 blocks (16 oz total) Full-Fat Cream Cheese: (CRUCIAL: Must be softened to room temperature to prevent lumps!).
- ½ cup Granulated White Sugar.
- 2 Large Eggs: (Room temperature).
- 1 tsp Pure Vanilla Extract.
The Spiced Apple Layer:
- 3 Large Crisp Apples: (Granny Smith or Honeycrisp are the best for baking! Peeled, cored, and finely diced).
- 2 tbsp Unsalted Butter.
- 2 tbsp Brown Sugar & 1 tsp Ground Cinnamon.
🍳 Step-by-Step Masterclass Instructions
Step 1: Prep the Oven and Crust 🛑
Preheat your oven to 350°F (175°C). Line a 9×13-inch baking pan with parchment paper, leaving an overhang on the sides for easy removal later.
In a large bowl, whisk the flour, oats, and ¾ cup brown sugar. Drop in the cold butter cubes. Use a pastry blender or your fingers to cut the butter into the flour until it resembles coarse, wet sand.
The Trick: Take exactly 1 ½ cups of this mixture and set it aside in the fridge (this will be your streusel topping!).
Press the remaining crumb mixture firmly and evenly into the bottom of your prepared pan. Bake for 10 minutes just to set the crust.
Step 2: The “Stovetop Sauté” Hack (Crucial!) 🍎
Do NOT put raw apples on your cheesecake!
Melt 2 tbsp of butter in a skillet over medium heat. Add your finely diced apples, 2 tbsp brown sugar, and cinnamon. Sauté for 5 minutes. You will see the apples release a lot of water! Keep cooking until the water evaporates and the apples are slightly soft but still hold their shape. Remove from heat and let them cool completely.
Step 3: Whip the Cheesecake Batter
In a large mixing bowl, beat the softened cream cheese and white sugar until completely smooth and creamy (about 2 minutes). Add the eggs one at a time, beating on LOW speed just until combined. Add the vanilla. (Do not overbeat the eggs, or the cheesecake will puff up and crack!).
Step 4: The Layering Magic ✨
Pour the smooth cheesecake batter over the slightly cooled shortbread crust. Spread it into an even layer.
Take your cooled, cinnamon-spiced apples and scatter them gently and evenly over the top of the cheesecake batter.
Finally, retrieve your reserved 1 ½ cups of streusel topping from the fridge and sprinkle it heavily over the apples.
Step 5: The Golden Bake 🔥
Bake in the 350°F oven for 30 to 35 minutes. You will know it is done when the streusel topping is golden brown and the center of the cheesecake only slightly jiggles when you gently shake the pan.
Step 6: The “Deep Chill” Patience Test ❄️
Remove the pan from the oven. Do NOT cut them yet!
Let the pan cool on a wire rack at room temperature for 1 hour. Then, cover it with foil and place it in the refrigerator for at least 3 to 4 hours (overnight is best!). Chilling sets the fats in the cheesecake, giving you those razor-sharp, pristine layers when you slice it!
Before serving, lift the entire block out using the parchment paper. Cut into squares and drizzle heavily with salted caramel sauce!
🔒 Storage & Freezing Tips
- Refrigerator Storage: Store the sliced bars in an airtight container in the fridge for up to 5 days.
- How to Freeze: These bars freeze beautifully! Wrap individual squares tightly in plastic wrap, then foil, and freeze for up to 2 months. Let them thaw in the fridge overnight before serving.


