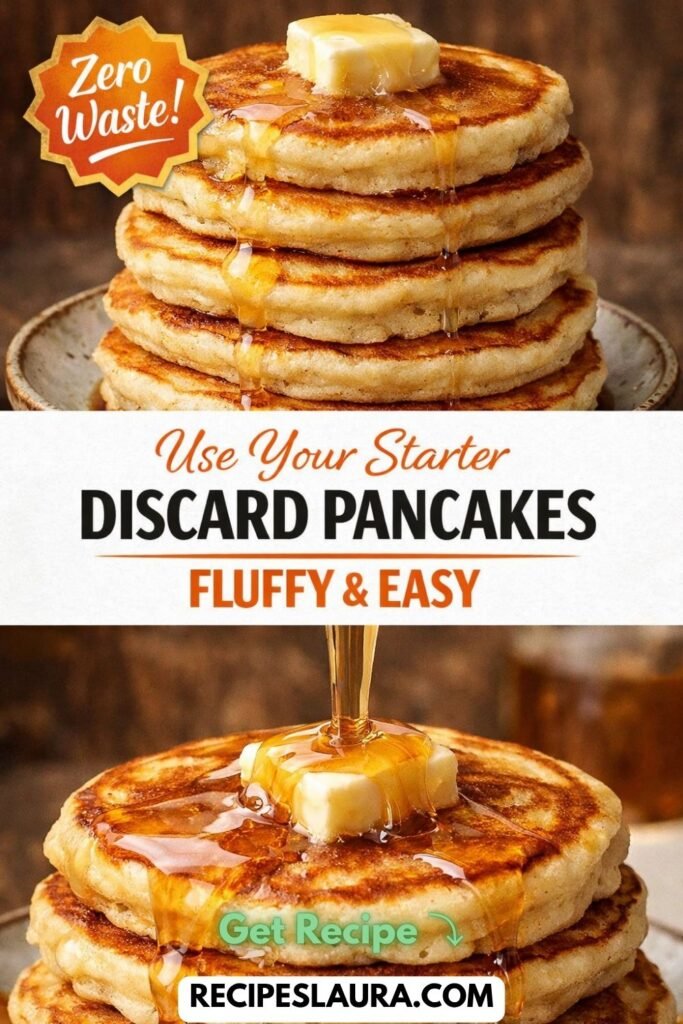
If you have a sourdough starter sitting on your counter or in your fridge, you know the guilt of throwing away the “discard” every time you feed it. Stop pouring flour and water down the drain! Embrace a Zero Waste Kitchen with these incredibly fluffy Sourdough Discard Pancakes.
Most sourdough pancake recipes require you to mix a “sponge” the night before and wait 12 hours. But what if it’s Saturday morning and your family wants pancakes right now?
This recipe uses baking soda and baking powder to give you instant, thick, diner-style fluffiness, while using up a whole cup of unfed discard. They have a deliciously subtle tang that pairs perfectly with sweet maple syrup. Best of all? They go from bowl to plate in 15 minutes!
🛒 The Ingredients (Pantry Staples)
You don’t need an active, bubbly starter for this. Cold discard straight from the fridge works perfectly!
- 1 cup Sourdough Discard (Unfed).
- 1 cup All-Purpose Flour.
- 1 cup Milk (Whole milk or buttermilk makes them richer!).
- 2 tbsp Granulated Sugar (or honey).
- 1 Large Egg.
- 2 tbsp Unsalted Butter, melted (plus extra for the pan).
- The Magic Leaveners: 1 tsp Baking Soda + 1 tsp Baking Powder.
- 1/2 tsp Salt & 1 tsp Vanilla Extract.
👩🍳 Step-by-Step Instructions (The Secret to Fluffiness)
The secret to these pancakes is the chemical reaction. The baking soda reacts instantly with the natural acid in your sourdough discard, creating millions of tiny bubbles in the batter.
Step 1: Whisk the Wet Ingredients
In a large mixing bowl, whisk together the sourdough discard, milk, egg, melted butter, and vanilla extract until well combined.
Step 2: Add the Dry Ingredients
Sprinkle the flour, sugar, baking soda, baking powder, and salt evenly over the wet mixture.
Step 3: The Golden Rule (Do Not Overmix!) 🛑
Using a spatula or wooden spoon, gently fold the dry ingredients into the wet. Stop mixing when there are still some lumps of flour visible! If you overmix, you will develop the gluten and your pancakes will be tough and rubbery. You will notice the batter getting puffy and airy almost immediately—that’s the baking soda working its magic!
Step 4: Heat the Skillet
Heat a large non-stick skillet or griddle over medium-low heat. Melt a small square of butter on the pan (butter gives crispy, golden edges!).
Step 5: Pour and Flip
Pour about 1/4 cup of batter per pancake onto the skillet. Cook for 2-3 minutes. Do not flip until the bubbles on the surface pop and stay open, and the edges look matte and set. Flip and cook for another 1-2 minutes until golden brown.
🍁 How to Serve & Store
Serve these immediately in a tall stack! Top them with a generous square of butter and let it melt all over the warm pancakes. Drizzle heavily with real, warm maple syrup.
Freezer Tip: This recipe makes a big batch! Let leftover pancakes cool completely on a wire rack, then freeze them in a ziplock bag. You can pop them straight into the toaster on busy weekday mornings for a quick, zero-waste breakfast.